Metco Motorsports PN MWL0304
1998+ Ford Crown Victoria / Mercury Grand Marquis / Lincoln Town Car and Mercury Marauder
Note to Installer: The installation of this kit is best performed on a vehicle lift. In all cases, work should be performed on a suitable, level surface with the vehicle properly supported. It is not necessary to remove the rear wheels for this installation.
- Remove the 24mm nut at the top of the differential housing from the Watts pivot arm
- On Air suspension vehicles, disconnect the link to the Ride Level Bracket. Gently squeeze the clip and the link will release from the pivot ball on the bracket
- Remove the bolt from the driver’s side Watts arm at the frame mount. This fastener will be reused.
- Remove the bolt from the passenger side Watts arm at the frame mount
NOTE: On Air suspension vehicles the removal of this bolt will require special petroleum jelly to the air bladder to allow the bolt to slide on the bladder. The bolt can be tapped out using a hammer and drift. This bolt will be replaced with the shorter bolt provided with your kit when the billet Watts link assembly is installed. - Remove the Watts link assembly as a unit
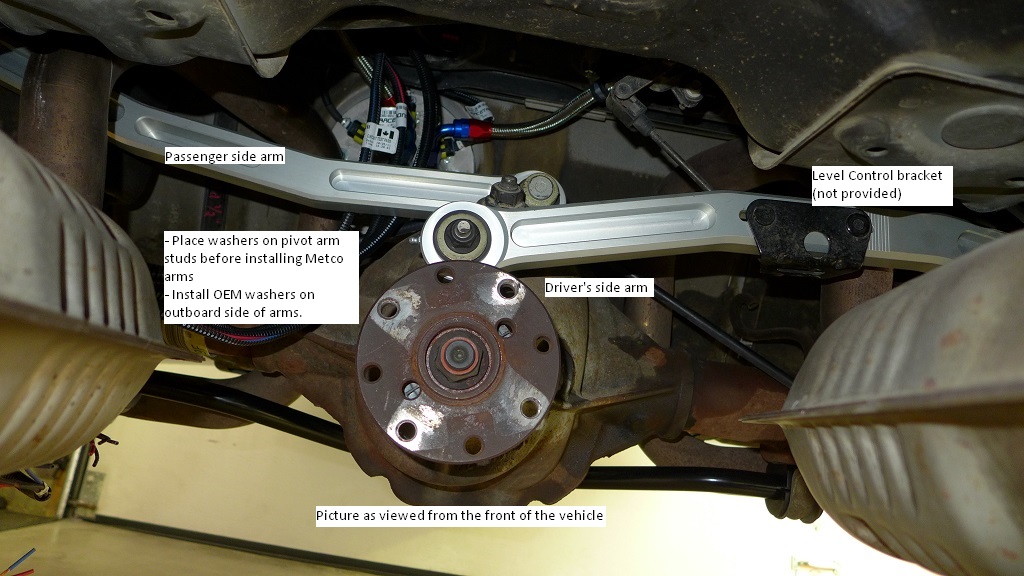
- The Metco Motorsports Watts Links are driver and passenger side specific. They cannot be interchanged. Refer to the diagram below for identification.
- Remove the original driver’s side Watts arm from the pivot link. On Air Suspension vehicles, the Ride Level Bracket must be transferred from the original link to the corresponding Metco link. Note the position of the level control bracket on the original link, and count the number of calibration marks visible from the edge of the bracket. This step is important because maintaining the same relative position of the bracket will serve to maintain the proper ride height of the vehicle.
- Once the bracket is removed and on your work surface, the large pin must be removed from the bracket. This pin is spot-welded to the bracket at three locations under the head of the pin, and can be removed using a large vise with a 3/4″ socket over the flat head of the pin. (This procedure requires some effort, but it works every time). The bracket should be transferred to the Metco link using the provided locknut and washers on the small pin and the provided bolt and nut to replace the pin that was removed. Position the bracket to match the original location on the original link, relative to the machined calibration marks on the Metco link.
- Remove the original passenger side Watts arm from the Watts link.
- Install the billet arms on the pivot link. Refer to the included diagram for orientation. Washers should be used on both sides of the arms at the pivot link, and the pivot link nuts should be tightened securely.
- Install the Watts link (arms and pivot) as an assembly. Slide the pivot link on the pivot stud and leave the 24mm nut loose at this time. (Now is a great time to upgrade that stock stud with an ADTR ARP watts link stud for added strength)
- Bolt the driver’s side Watts arm to the frame using the original fastener.
- Bolt the passenger side Watts arm to the frame using the shorter fastener provided. The bolt should slide into the bracket from the front side. It may be necessary to shift the rear axle or body of the vehicle to insert the bolt. Use the original nut at the rear side of the bracket. The bolt is shorter so as not to interfere with the air bladder (if applicable).
- Attach the level control link to the bracket on the driver’s side Watts arm (if applicable)
- Torque the pivot stud to housing to 199 foot pounds. Torque the pivot stud to nut to 184 foot pounds. Torque the watts link arms to frame bolts to 76 foot pounds and the watts link arms to center pivot to 68 foot pounds.
- Install the provided grease fittings at each attachment point of the Watts arms. Lubricate each bushing using a quality chassis lube – synthetic lubricants are preferred. Use caution to avoid over-lubrication.
- The Watts link arm fasteners should be checked for proper tightness periodically and that bushings remain properly lubricated.PICTURE FOR REFERENCE: